Braised Eggplant and Zucchini in Tomato Shallot Sauce

Posted on

I’m always on the lookout for recipes calling for either eggplant or zucchini as an   ingredient – vegetables I really want to like, and want to use more of in everyday cooking.  Mostly, I’ve been disappointed in the results I’ve obtained.

That’s why I didn’t have high hopes for the first version of this recipe when it came   across my desk.  However, with a lot of experimentation and tweaking, I came up with an iteration that pleased me –   and as an added bonus, it’s easy to prepare.

The recipe is straightforward enough that no prep notes are needed.  Try this as a side dish with roast beef, grilled steak, or roast chicken.

¼ cup Extra virgin olive oil
1 Shallot, minced
1 Bulb garlic, minced
1-29 oz. can Whole tomatoes, with juice
2 tsp. Kosher salt
3 Bay leaves
1 Eggplant, sliced in ¼” slices, then quartered
2 Zucchini, sliced in ¼” slices
½ cup Italian parsley, rough chopped
A/R Ground black pepper
In a Dutch oven or large skillet, sauté shallot in olive oil until translucent, about 2 minutes.  Add garlic, sauté for an additional minute.  Add tomatoes, salt, and bay   leaves.  Stir frequently, until   tomatoes are broken down.

Add eggplant and continue to cook, until eggplant is soft (if mixture gets too dry, add additional water).  Add zucchini and reduce heat, continuing to   stir frequently.  Cook an additional 15 minutes or until all vegetables are tender.    Remove bay leaves.  Add parsley, additional salt and pepper to taste.

Just before serving, drizzle with additional olive oil, and garnish with additional parsley if desired.


Chicken Parmigiana

Posted on

Truly, the hardest thing about this dish is spelling it – it’s so absolutely easy, and can be made in an incredibly wide variety of ways.

The basic elements of chicken parmigiana are: chicken, pasta, sauce, mozzarella cheese, and parmesan cheese.  What you use, and how you use it is entirely up to you.  The following is my way of doing it, and can certainly be used as a   springboard for endless variations you may come up with.

My recipe uses chicken breasts, penne pasta, and marinara.  Yours may use bone-in thighs, fettuccine, and alfredo sauce.  Be adventurous!

As with many of my recipes, it’s every bit as easy to make larger amounts as smaller portions, so consider making a couple extra pans to store in the freezer.  Nothing like having a delicious heat-‘n’-eat dinner during the busy midweek times!

The chicken is breaded and cooked separately, then added to the pasta/sauce before being baked.

3 Boneless, skinless chicken breasts
1 cup Unseasoned bread crumbs
1-1/2 tsp Garlic powder
1 tsp Onion powder
1-1/2 tsp Italian seasoning
1 tsp Paprika
1 tsp Ground black pepper
½ tsp Sea salt
1 Egg
A/R Olive oil
8 oz. Penne pasta
32 oz. Prepared marinara sauce
1-1/2 cups Shredded mozzarella cheese
½ cup Parmesan cheese
Whisk egg in a bowl; set aside.  Mix bread crumbs and spices in a bowl.  Split chicken breast lengthwise; dredge in egg and coat in bread crumb mixture.    Place breasts in oiled baking dish; roast in a preheated 350° oven for 35 minutes; set aside.

Cook pasta according to directions; toss with marinara sauce and ¾ cup mozzarella cheese.  Place in 9”X13” baking dish, and arrange chicken breasts over the top.  Cover   with the parmesan cheese and the balance of the mozzarella.  Heat in a 350° oven until heated through and cheese is melted (about 15 minutes).


Tomato-Basil Soup

Posted on

Rich, hearty, and simple are some of the ways this soup can be described.  I did some extensive experimentation before coming up with a combination of ingredients that agreed completely with my   taste buds.  Everybody knows that tomato and basil go together in a variety of dishes, but this particular pairing is absolutely superb.

It’s such a straightforward recipe, I can’t think of any prep notes to include.  Be sure to make plenty, and freeze what you don’t eat.

3-14 oz. cans Tomato puree or crushed tomatoes
1 Bulb garlic, minced
1 Medium onion, chopped
1 cup Heavy cream
2 cups Low-sodium chicken broth
1 tsp Sugar
¼ cup Olive oil
30 Large basil leaves, finely minced
A/R Sea salt
A/R Black pepper
In a Dutch oven or similar large pot, sauté onion and garlic in olive oil.  Add cans of tomato puree; cover and simmer slowly for approximately 15 minutes,   stirring occasionally.

Add chicken broth and heavy cream; bring to a simmer again, stirring frequently until mixture reaches a moderately thick consistency.  Stir in basil and sugar; add salt and pepper to taste.

Ladle mixture into a blender; carefully puree until smooth.  Pour back into pot; heat until piping hot.  Serve hot.

This soup keeps in the fridge for 3-4 days, and freezes well.


Belgian Waffles

Posted on

Here’s an awesome recipe for my version of Belgian waffles – there are two things that   make this recipe a standout: first, it’s yeast-based, which makes it rise much more than the standard baking powder version.  Secondly, I use whipped egg whites to add to the fluffiness.  I thought about how to describe the texture of the finished product, and the best thing I can come up with is that it’s very much like a Krispy Kreme® donut slathered in butter and syrup!  It’s a crispy golden brown on the outside, and light and fluffy on the inside.

Plan on an extra hour in prep time, since the batter has to rise for that length of time.

4 cups All-purpose flour
3 cups Whole milk, heated to ~110°
¾ cup Butter, melted
4 Eggs, separated
½ cup Sugar
2 tsp Active dry yeast
1-1/2 tsp Salt
2-1/2 tsp Vanilla extract
Warm ¼ cup milk to 110°, and in a measuring cup, mix with yeast.  Set aside until mixture thickens and becomes bubbly (about 15 minutes).

Separate eggs, set aside whites.  Combine egg yolks, 2-3/4 cups warm (110°) milk, yeast mixture, salt, sugar and vanilla.  Melt butter, add to mixture.  Whisk together, slowly adding in flour until well-mixed.

In a mixer bowl, whip egg whites at high speed until fluffy and peaks form.  Fold gently into batter mixture.

Cover bowl with plastic wrap; put in a warm place for 60-70 minutes.

Make waffles according to waffle iron manufacturer’s directions.

Makes approximately 6-8 servings.


Mexican Flan

Posted on

Flan is one of those things that, on the surface of it, seems like it would be hard to make – but in reality, it’s very easy!  My recipe is a compilation of several print and online recipes that I’ve perfected over the years.


Let’s start out by talking about what flan is: at its most basic, it’s a Mexican custard,   borrowed from Spanish custard – and virtually every region has its own version of this delicious dessert, crème brûlée probably being the most   widely known.  One of the differences   between flan and crème brûlée is that flan has the caramel topping already in place when it’s baking – crème brûlée has a sugar topping that is caramelized   with a propane torch just before serving.  I opt for flan – because I’m not allowed to use a torch inside the house when my wife isn’t at home.  It’s a long story, but a good one…


Another nice thing about this flan is you can make it in several different flavor   configurations – if you like lime, use a bit of frozen limeade concentrate and some lime zest.  Same idea if you like lemon or orange.


Prep notes   aren’t too lengthy (I hope) – I   recommend using C&H® Baker’s Sugar for melting – its superfine   granules melt much faster and more fully than standard granulated sugar.  Stir it constantly with a whisk, and watch that you don’t use too much heat – it will liquefy to the consistency of   water, and when you get a light to medium amber color, you’re done.

I don’t have a special flan mold, so I use a glass pie pan with very good results.  You should do the same.  The pie pan sits inside a larger pan filled   with about an inch of boiling water – for the larger pan, I use a disposable   aluminum lasagna pan – you can also use an oven-safe skillet just as   well.  Just make sure that when you add the water before baking, it’s at a full rolling boil when you take it off the stove top.

You can use a mixer at high speed for mixing, but I prefer a blender – it’s quicker and   doesn’t splash all over the counter.  My Ninja® knocks it out in less than a minute.

You’re making the flan upside-down, of course – just before serving, run a thin knife around the inside of the pan to loosen.    Then place a plate over the pan and flip the whole works over.  There you have it – a right-side-up hunk ‘o’ flan with the caramel on top!


Have fun with this one, guys…


1-1/4 cup Granulated sugar
1 cup Whole milk
1-1/4 cup Heavy cream
1 14 oz. can Eagle Brand® Sweetened Condensed   Milk
3 Whole large eggs
4 Egg yolks
3 Tbs Pure vanilla extract
1 Tbs Cornstarch
1 Vanilla bean (optional)
In a medium pan over medium heat, heat   sugar, stirring constantly with a whisk, until just melted and it turns a light amber color (usually about 8 minutes).  Pour melted sugar into pie pan or flan mold.  Allow to cool till just slightly warm.

Meanwhile, preheat oven to 350°, and start   a pan of water heating to a boil.

Add milk, sweetened condensed milk, eggs, egg yolks, vanilla extract, and cornstarch to blender; pulse until well-blended.  If using vanilla bean,   slice it lengthwise, scrape out seeds, and add seeds to mixture.  Reserve scraped-out bean for top garnish on the finished product.  Add heavy cream,   and pulse only until incorporated into mixture. Pour into pie pan.

Carefully lift filled pie pan into a larger skillet or container; place on center rack of oven and carefully pour in   boiling water until it comes up halfway on the side of the pie pan.  Take care not to splash any water into your   flan mixture!

Bake for 45 minutes to 1 hour, or until top (actually the bottom) of flan is a very light golden brown.  The flan should   still be wiggly and jiggly at this point.  Remove from oven, and allow to cool on a cooling rack until barely warm.  Transfer pan to the fridge and   chill until thoroughly cold, about 4 hours.

To plate the flan, run a thin sharp knife around the perimeter of the flan to loosen. Cover with a plate and flip   over.  The flan will come out onto the serving plate, and the gooey caramel syrup will cover the top and sides.  Slice in generous pieces, and serve.  Flan will stay fresh in the refrigerator   for 3-4 days if covered with plastic wrap.    Don’t attempt to freeze it – it doesn’t work.


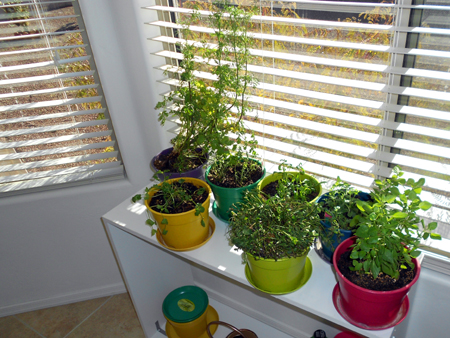
Creating an Indoor Herb Garden

Posted on

Last week, I accomplished a long-standing project idea, when I finally put together my own indoor herb garden.  Most of my readers know that I use a lot of fresh herbs in my recipes – there are many reasons for this: first of all, I like the flavor that fresh greens add to any dish.  Also, by varying the chop size, I can add visual appeal – something that dried herbs just don’t have.  And finally, I like to know (as much as possible, anyway) how my ingredients were processed.  I’m familiar with the sterilization process herbs and spices undergo (typically ethylene oxide [EtO] gas sterilization).  And I’ve heard stories of what critters are still crawling on the dried leaves when they go into the sterilization chamber – I won’t be telling you anything about that, except that you don’t want to know…

So, step by step, I’ll share my process for how I did it – remember, this is only one way of doing things, but I’ll try to keep things basic enough that you can adapt it to your own situation.

  • Plan it out – Before you ever put on your gardening gloves, you’ll need to make some decisions.  First, where will it be located?  Mine is in front of three large, sunny windows just off the kitchen.  So, I recommend setting up in the sunniest location in your home.  Don’t have a sunny location?  Hey, no problem… every garden center and hardware center sells grow lights that work mighty fine – just put them on a timer to simulate the hours of natural sunlight they would receive.  One location I can’t recommend is your kitchen countertop.  I know, that’s where all the TV chefs have theirs, but plants tend to drop leaf debris, and attract insects – two things you probably don’t want in your food prep area.  Plus, who has that much counter space?
  • Next, decide what kind/size of pots you’d like.  As with any living plant, a larger pot will allow more room to grow – but your own situation will necessarily dictate size to a large degree.  And your décor will help decide what kind of pots you get.  I found some great multi-colored pots at my local hardware store – they’re made of a resin-like material, so they’re unbreakable (a good thing for a stumblebum like me!)  If you like ceramic or terra cotta, go for it – it should add to your décor, not be an eyesore.
  • What will the pots sit on?  I built my shelves out of precut finished pressed wood from Home Depot.  I used “L” braces to securely fasten them together.  You might prefer wrought iron vertical plant stands, or something else.  Once again, your decision will be helped by the amount of space you have, and what room they’ll go in.  If you want to use a board suspended across two cinder blocks, that’s fine.
  • What herbs shall I grow?  This depends on 1) available space; and 2) your cooking needs.  For me, I have room for 8 pots, so I’ve chosen sweet basil, Greek basil, oregano, peppermint, tarragon, thyme, cilantro, and Italian parsley – this should cover nearly all my needs.  I exclusively use Bonnie Plants – dollar for dollar, they’re the highest quality you can get.  Make sure you visit their website; they have extensive growing guides for each variety, and lots of help for people like me that aren’t blessed with a green thumb.  They tell me that, in general, herbs are some of the easiest plants to grow – I believe that to be correct.  If I can grow them, it follows that anyone else should be able to.

I hope I’ve piqued your interest in giving herb-growing a try.  Let me know how your garden grows!

Chicken Brine

Posted on

I’d like to   dedicate this recipe to my friend Grace – a fellow foodie and such a devoted   friend – thanks for keeping a smile on my face, dear one!So, what do we have here?  Well, of course I’ve   heard of brining meats and vegetables for a long time now – and I actually   tried it once, years ago, on shrimp.  Big mistake… it turned out too salty to be edible.  I don’t know what I did wrong, but I stayed away from brining until just recently.

As is usually the case, I started out by comparing several recipes I’d found online   and in print, and combined what I thought were the best attributes in ingredients, proportions, and instructions – what I came away with was   definitely worth the slight effort. The brine and seasonings make the chicken so much more juicy and tender – it’s not just a small difference – it’s very noticeable!

The only special note I can offer is the obvious – rinse the bird very well when you’re all done… the salt and other seasonings have done their job; it’s time to let them go.  When it’s ready,   prepare the chicken as you normally would – for me, it meant smoking it with   hickory, and making some delicious chicken salad.  I’d recommend roasting it rather than pan-frying, but it’s your call.

1 cup Kosher salt
1 cup Sugar
1 cup Soy sauce
½ cup Olive oil
3-4 Bay leaves
8-10 Smashed garlic cloves
A/R Cold water
In a large container or pot (a Dutch oven   works well), combine the ingredients with about a quart of water.  Place the chicken in the container; and   enough additional water to cover.    Cover the container, and place it in the refrigerator at least overnight.  The next day, rinse the   chicken thoroughly, and cook as desired.

Catalina Breakfast Bake

Posted on

I’ve been  tasked with making a breakfast dish for church on the 4th Sunday of each month – and I need to make enough to last for both Sunday   services.  That’s a lot of breakfast – which means that the more complex dishes are out of the question.  It has to be fairly simple, and able to be made in quantity.


My thoughts   immediately turned to some sort of breakfast casserole – but the recipes I   found online all looked bland.  Folks that know me know that I don’t do anything bland!  So, I’ve spent the last couple of days   experimenting with my own combinations of ingredients, and I’ve hit upon what I believe to be the perfect blend.  It’s a delicious combination of egg, breakfast sausage and cheese, with green chilies   added to give it the requisite Southwestern flair.  This morning, I was finally able to nail down the correct proportions of ingredients, so I present it to you now.  When you create your own recipe, you of   course get naming rights, so I named it as I saw fit.

One note to   add, it seems to work out better to assemble it the night before, to allow the croutons to absorb some of the liquid.  And speaking of liquid, if it seems too watery, cut down the milk next time around.

1 lb Ground breakfast sausage
1 medium Onion, diced
2 Tbs Canola oil
1-1/3 cup Frozen hash brown potatoes
9 large Eggs
¾ cup Milk
1-4oz can Chopped green chilies
1 Green bell pepper, diced
1 Red bell pepper, diced
1 tsp Red pepper flakes
1 tsp Ground mustard seed
1 tsp Paprika
1-1/2 cups Seasoned croutons
2-1/2 cups Mild cheddar cheese
A/R Salt
A/R Pepper
In a medium skillet, sauté sausage and   diced onion. Drain; set aside.

In a mixer on low speed, combine hash browns, eggs, milk, green chilies, bell peppers, pepper flakes, mustard seed, paprika, and 1 cup cheese.  Mix   thoroughly; add sausage mixture and mix until coated thoroughly.

Cover the bottom of a 9”x13” baking dish with   croutons, and then pour egg mixture over top, taking care to cover the   croutons thoroughly.  Cover mixture   with remaining cheese.  Wrap tightly,   refrigerate overnight.  The next morning, bake in a preheated 400° oven for 45 minutes until cheese starts to   get bubbly.  Allow to rest 5 minutes before serving.


Gorditas

Posted on

In the Mexican state of Chihuahua, gorditas (“little fat ones”) are a popular food – thick deep-fried cornmeal patties, which are generally split partially through the edge, creating a pocket that’s then stuffed with meat, cheese, lettuce, avocado, and sour cream.

My gordita recipe is traditional in the way they’re made, at least – but I serve them a bit differently: before frying them, I make an indentation in the center of each,   pressing the sides slightly upward to make a natural bowl for the added goodies.  The reason I started doing them this way is simple – I really have trouble splitting them to make the pocket!  Try them both ways; see which works best for you.

I use lard in my recipe, but shortening works equally well.

You can make these a few hours ahead of time, but be sure to warm them just before stuffing and serving.  I don’t advise freezing them; but they’ll keep for a day or so in the fridge.

For those that have never used masa harina, it’s available in all supermarkets, either near the flour or in the Mexican foods section.

And by the way – the product that Taco Bell® calls “gorditas” doesn’t even resemble an actual gordita.  And why is it that Taco Bell feels the need to introduce a new menu item almost monthly, even though it basically contains the same four ingredients?  It’s called “core competency”, folks – stick with what you do best, and put your corporate resources toward providing the best taste and quality possible!

Uh oh… I feel a rant coming on…

2 cups Masa harina de maiz
1/3 cup All-purpose flour
1 tsp Salt
1 tsp Baking powder
3 Tbs Lard, chilled and cubed
1-1/2 cups Warm (~120°) water
With an electric mixer fitted with a dough hook (or a food processor with a Pulse control), combine all dry   ingredients.  Add chilled lard; mix   until a coarse mealy mixture appears.  Slowly add warm water until dough is smooth (you may not need the entire amount of water).

Remove dough from mixer; form into a ball with hands.  Wrap ball in plastic wrap; and allow to rest at room temperature for 1 hour.

On a lightly floured counter, divide the dough into 8 equal pieces.  Using your fingers, form each piece into a circle about ½” thick and 4” in diameter.  Make an indentation in the center of each circle, making a sort of bowl shape.    Fry in a 375° deep fryer until golden brown.  Drain on paper towels.

Serve with taco meat or chili in the center; add lettuce, tomato, cheese, sour cream and avocado as desired.


Review: Cuisinart® Griddler Gourmet®

Posted on

Here’s my review of the Cuisinart® Griddler Gourmet® countertop grill.  The Griddler is advertised as an “all-in-one” appliance, combining contact grill, Panini press, full grill, full griddle, and half-grill/half-griddle options.

I purchased the Griddler recently as an alternative to stovetop grilling (okay, it was mostly an impulse purchase).  Initially, I had some misgivings about a product sold as performing multiple tasks; it’s been my experience that they usually don’t perform any of the advertised tasks very well – or at least not as well as a single-purpose item.  But after using the unit for some weeks now, I’m quickly becoming a convert.

The Griddler’s controls are not as intuitive as I’d like – there are three controls on the front of the unit: Selector, Griddle, and Grill-Panini.  First, you must select what you intend to cook, and then use one of the other dials to select temperature.  Adding to the confusion is the fact that the griddle temp is set in degrees F., but the grill temp ranges from Warm to Sear.  And, if you want to use the unit as a half-grill/half-griddle, you can use either temperature control.  Got it?  Me neither…

One of the great features of this device is the reversible grill plates, which boast a non-stick coating.  One side of each plate has a standard grill layout, so you’ll always get attractive grill marks on your creations.  The other side is simply a flat-top griddle.  Flipping the grill plates couldn’t be simpler, thanks to easy-release buttons top and bottom.  The plates are also dishwasher-safe, and clean up easily and well.

Another feature worth noting is the floating hinge – this is how the Griddler is able to grill items of varying thickness while maintaining full contact with the cooking surface.  It’s a simple gizmo, actually… an additional pivot point on the top half of the unit.  But it works quite well for thicker meats, etc., and I’ve found that it will handle thick sandwiches with ease.  A button locks and unlocks the pivot.

It takes less than 10 minutes to bring the Griddler up to temperature once you figure out which knob turns it on.  Bi-color LEDs change from red to green when the temperature setpoint is reached.  Power consumption is a reasonable 1500 watts (about the same as the average blow dryer) and the power cord stays cool during the entire cooking session.

Performance of the appliance, in my opinion, falls somewhere between good and very good, which means that it meets most of my needs.  I’ve used it several times for various grilling/griddling jobs, with consistently good results.  Obviously, certain jobs are best left to more conventional cooking methods, but overall, the results met my expectations.  The Griddler has a removable drip tray (also dishwasher-safe) which purports to catch grease and other liquids generated as a result of grilling.  Sadly, it doesn’t work.  The unit depends on gravity to route drippings to the rear of the grill plates, where it’s supposed to run into the tray.  But instead, liquid seems to just stay in the spaces between the grill bars.  Of course, elevating the front of the unit slightly would help, but modifications such as this shouldn’t be necessary – so I’ll categorize this as a design flaw.

Nevertheless, I won’t hesitate to recommend the Griddler, at least until I have something to compare it to (which probably won’t happen, since this appliance does all I need it to do).

One final recommendation – for about 40 bucks, Cuisinart sells a pair of extra plates for making Belgian waffles on the Griddler – so if you’re a waffle fan, I’d suggest making the extra investment, thus eliminating the need for an additional appliance.